Behind the Scenes: Crafting the On-Chain SVG Capsules
With each Logged Universe story, we try to find an artifact from it that could become a generative art NFT collectible: both a way for fans to collect something meaningful, but also as the primary way to support the production of the story.
You can mint them here (until 31 October 2022): https://capsules.untitledfrontier.studio
In “Upstream Glitches” by Vesta Gheibi, dealing with the simulation’s school of unlearning, one of the lessons required the simulated minds to visualize the lives they had lived.
“That very first challenge was memorably exciting. They had to design capsules containing a visualisation of all their lives, a way to simplify the entirety of their existence. These capsules were then placed into one of many tubes that stuck out the top of a looping scrap metal structure. They’d watch the capsules loop around the various connecting pipes and rails and catch it before it flew out at the end. Every now and then they’d be asked to add more capsules to the sequence, so they’d have to watch multiples of them looping around before catching them. If you missed one, you were out.”
The design took inspiration from colourful sand jars, layered with potential meaning.

Each layer would represent a lifetime or a chapter in the life of a simulated mind. In some cases, they would mark their experiences: powerful moments they wished to remember.

Layers of SVG
These capsules are generated and cobbled together with SVG from an Ethereum smart contract.
Let’s break it down how they are created. The code is public, so you can follow along if you want.
Each capsule has a unique hash that changes 29 variables to create each capsule. This hash is chopped into bytes that are then manipulated to fit specific numbers for specific uses cases.

Underneath the hood, the smart contracts concatenates several SVG components together.

The hash is derived from the token ID to create the bytes32 hexadecimal variation of it: From 49571965386904856003662048530017481436897827922764362040538318834473085340282 to 0x6d98bcf525d09e27d5a9941a3484748aa1161365cf45c7456271f88eb18e8a7a. Every byte will yield a number between 0 - 255.
The core layers of the SVG are:
Definitions: these are the filters, masks, clip-paths, etc that’s used to modify the shapes.
Sand Crafting: the generative code to produce the glitchy layers of colourful sand.
The Cut Out: this section cuts out the capsule from a white sheet and adds the marked experiences on top.
Capsule Outline: this section adds more to the outline on top of the cut out.
The definitions modify/clip/mask the shapes and so let’s start instead with the crafting of the sand. This will explain some of the filters and SVG tools being used.
Sand Crafting
The sand itself is generated from two components. A background “fine sand” section that’s often more psychedelic, cloudier, and glitchier. And a front component that layers modified rectangles compactly through the capsule. With the above capsule, you can see the two components clearer.

Background Sand or “Fine Sand”
The fine sand is crafted from an SVG filter. This Solidity code is built/modified using the SVG library created by w1nt3r.

In the Descriptions.sol file
Here you can see the first part of the hash used to generate different outcomes. The first three changes come in the form of the colour offset. When you generate a turbulent noise (feTurbulence) and apply the filter to a rectangle, it’s colourful in itself.
Without colour offsets, it would look like this:

For Red, Green, and Blue channels, the algorithm modifies it by either adding or subtracting the colour. In addition to that, it tries to change the strength of the change. A positive+0.99 change in the Red channel will add a lot more red, for example. In this capsule’s case, it ends up being modified to:
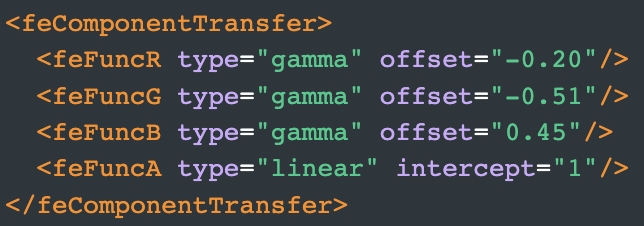
Reducing Red by 0.20. Reducing Green by 0.51, and adding more blue 0.45. The “A” (for Alpha) channel just means that the colour changes should bleed to ensure there’s no white spaces. This result in the blue and purple-ish clouds as the fine sand section.
The cloud itself is changed by 2 random variables derived from the hash: the seed for it and the amount of “octaves”. The octaves, being a number from 1 - 5, changes the viscosity and sharpness of the filter (in other words, it makes the clouds poofier or edgier).
Here’s the filter with an octave of 1 vs 5.

Octave of 1

Octave of 5
The seed is a number between 0 - 255 that changes the entire variation/shape. While this capsule is seed 39, even seed 38 will produce a totally different modified variation.

Seed 38
Front Compacted Rectangles
Now, let’s look at the front of the sand layers: the compacted sand rectangles. On their own, they look like this.

There’s an interesting algorithm the determines how these rectangles are drawn and there’s multiple variations that could be produced.

Using the hash again, we chop it up to get new random numbers to use.
They are:
Amount: how many rectangles should be drawn (2 - 18 rectangles)?
Range: how much space should the entire box of rectangles try to take up (220 - 284)?
Colour: what is the starting colour we should use (based on the HSL colour wheel) (0-360)?
Colour Shift: for each rectangle, how much should the colour shift along the HSL colour wheel (0-255)?
For every second rectangle the height of the rectangle gets exponentially smaller (that’s what the “>>” operator does). This process is supposed to simulate the principle that the sand gets more compacted as it goes deeper into the capsule (and thus further back in the past of the uploaded mind).

Every rectangle has a 1/5 psuedo-random chance of getting drawn. This breaks up the layer to let the psychedelic layer in the background in.
So, in short, the rectangles get more compacted and the colour changes consistently. Thus, in some cases, you get some interesting patterns, like a low colour shift in this one:
As you can see, in the above one, the lines are also more solid and less glitchy. Let’s look at the filter used to distort the borders of the sand.
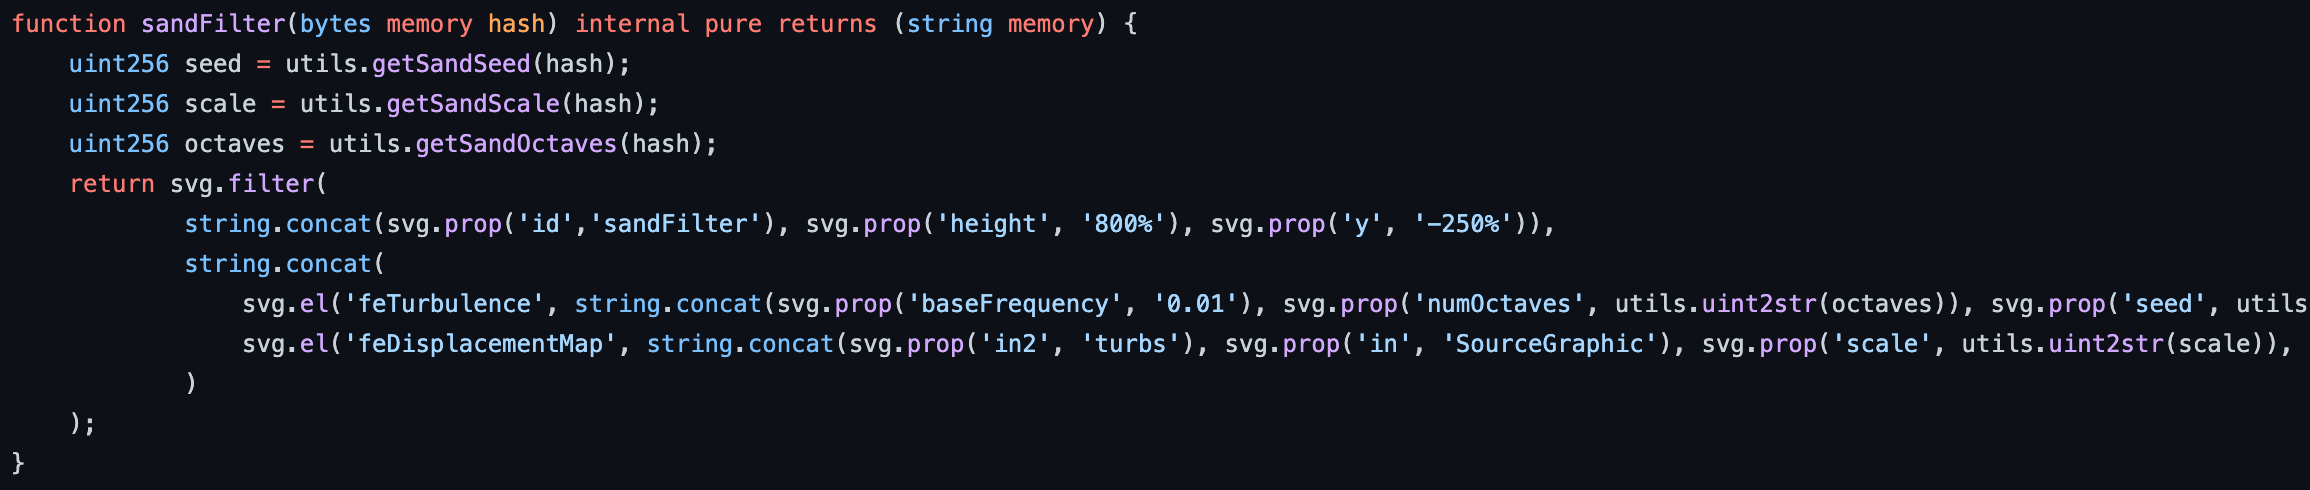
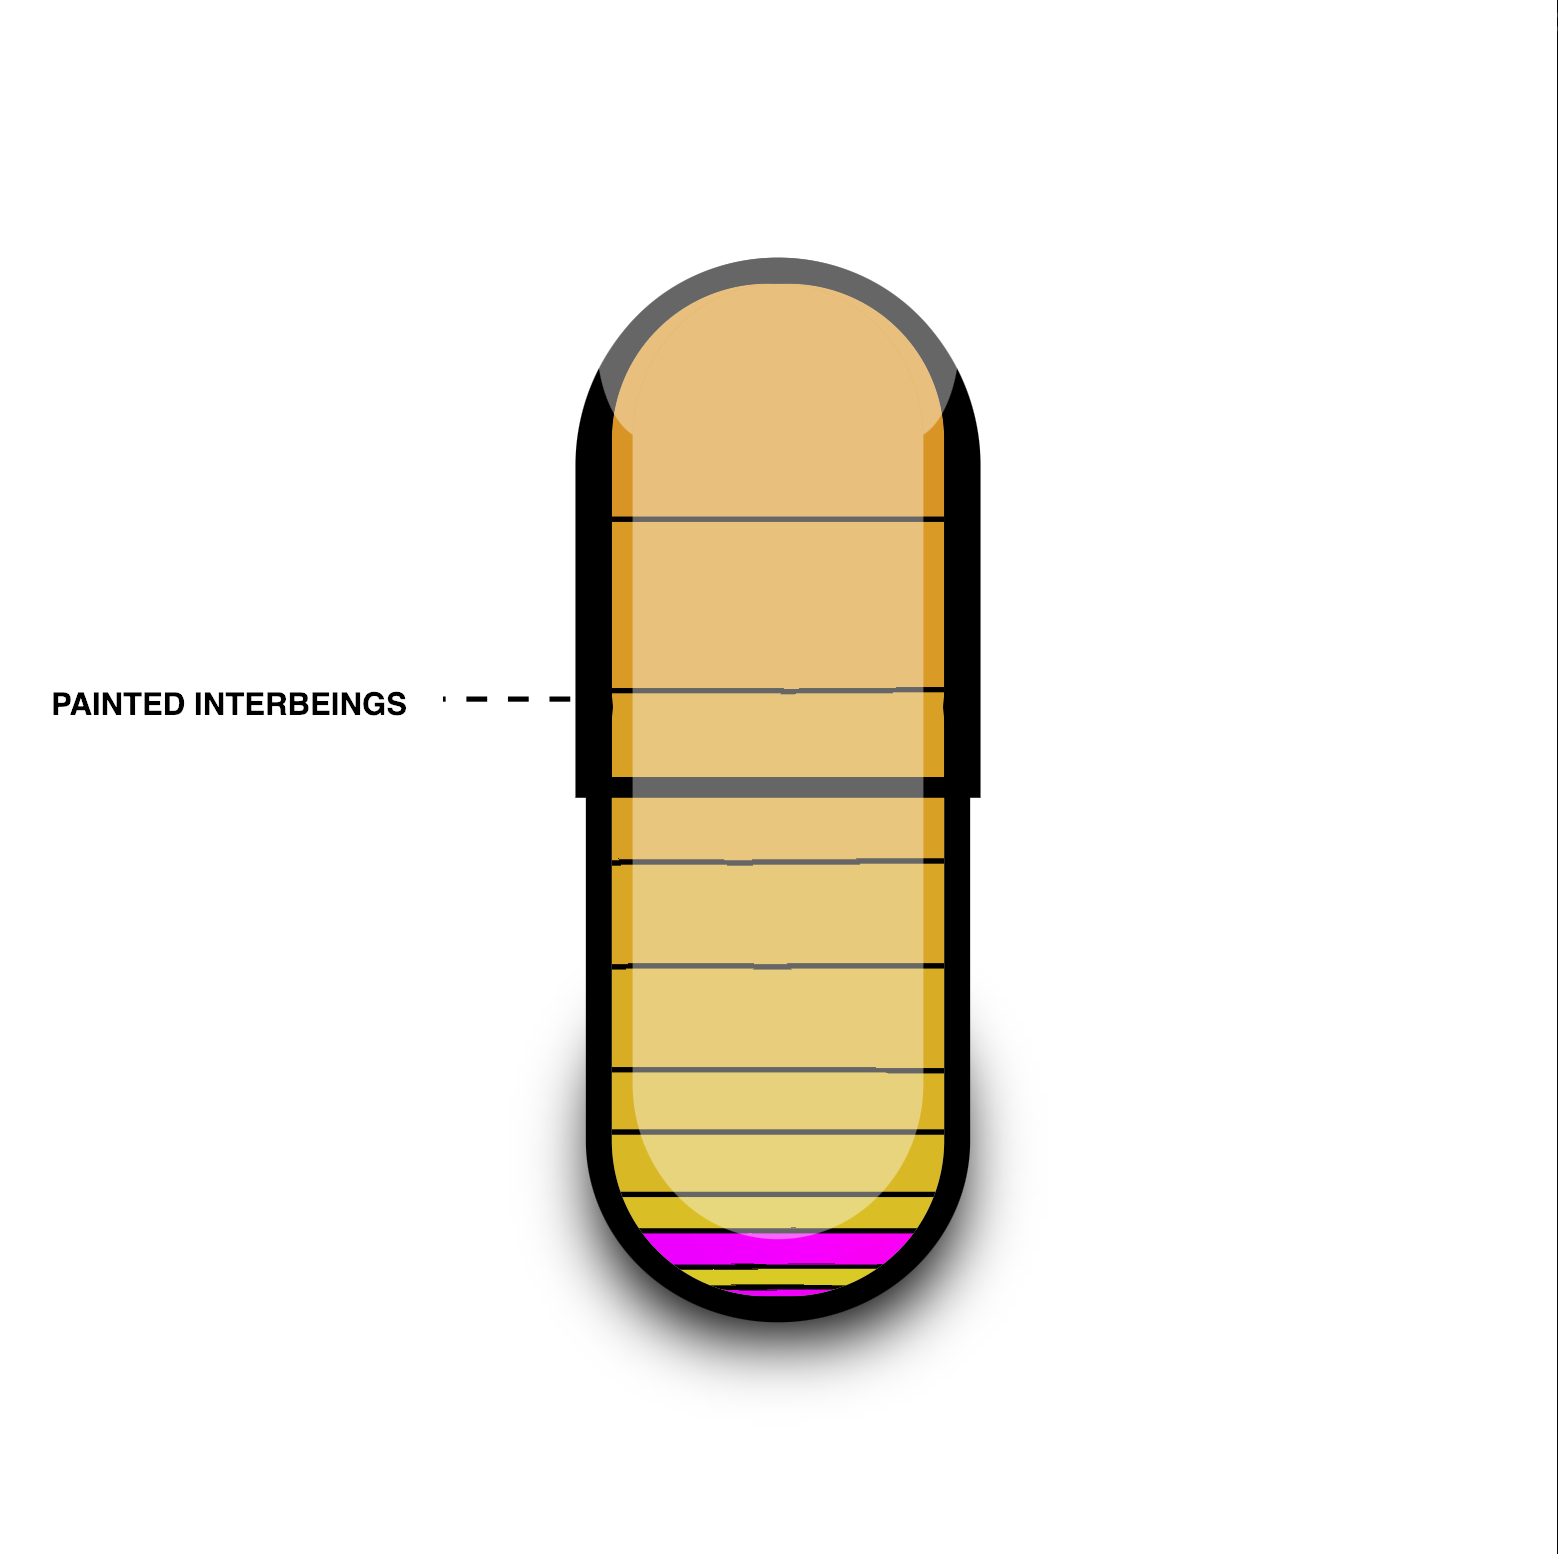
Like in the “fine sand” background filter, it also has a changing octaves and changing seed. However, this filter isn’t used to draw a rectangle, but is used as a “displacement map” to the rectangle. What this does is morph the shape with the filter. Different filters (according to seed and octave) would change the look of the distortion. There is another variable, however, “scale”, that gets introduced in the displacement. This variable increases the strength of the distortion. Thus, in the original capsule it’s more distorted, but in the interpainted beings capsule, it’s less distorted in general.
In this one, you can see that the glitches are sharp, but strong, blending lives and experiences across each other in a stark, contrasting way. You can also see in this one, the colour shift being small but enough to create a rainbow effect.

The Cut Out
The next step is to fit the following blob of sand into a capsule shape.
There are two ways to do this: a clip-path or a mask. A clip-path layered over the entire group of sand shapes will cut out and keep only the area you specify. A mask when applied to a layer is like a stencil: if you paint on a stencil, the areas that were cut out in the stencil will be drawn, but the area you paint on the stencil that are solid, will not be drawn. In SVG vocabulary, it’s: a white pixel gets drawn. A black pixel does not get drawn.
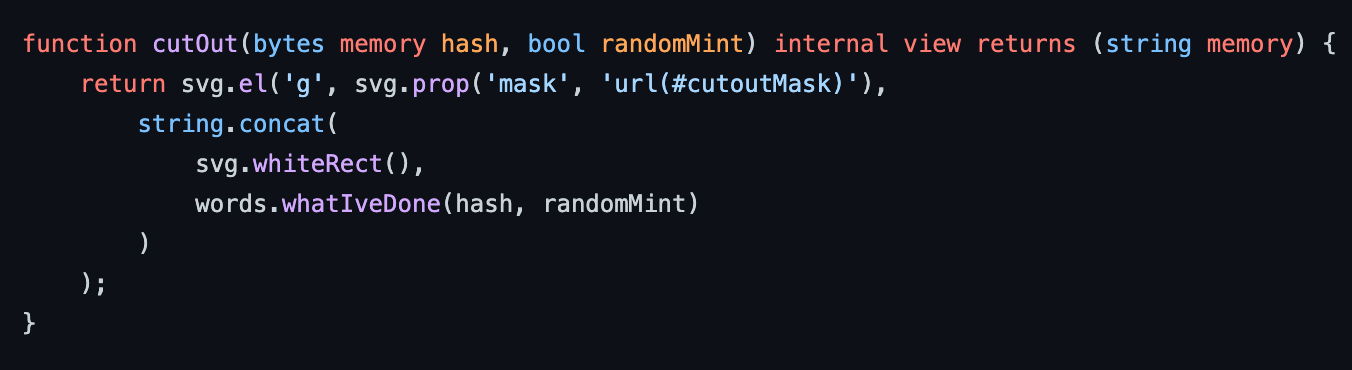
We opted for a mask, but in a bit of work-around way. We added a white rectangle layer and then applied a mask on the white rectangle (instead of directly on the sand).

The mask might not be intuitive as it is creating a white background with a black capsule shape in the middle of it. We essentially put a white stencil in front of the sand that has a shape cut into the capsule.
You might wonder why? A clip-path is simpler. The reason we went for a mask in this manner is that we re-used it for other parts of the capsule. In those instances, using a clip-path would be harder.
Although it’s not strictly necessary, what is being drawn on the white stencil layer includes the marked experiences. This is what it looks without additional outlines drawn on top of the stencil layer.

The fact that it is two rectangles instead of one is vestigial. Initially, I drew the capsule without borders and wanted to create the feeling of a bottom and top without it. Technically, you could just use one round rectangle here.
The Experiences
Probably my favourite section! The marked experiences are notable points in the lives of each simulated mind that they wanted to mark. Vesta Gheibi wrote all of these and they are so wonderfully colourful in their own right. There are 95 experiences in total, with 32 of those only available to be minted in a random mint.
In total, there are 10 slots for a marked experience to occur (5 on the left, 5 on the right). To determine what experiences go in what slots, a function pulls together the indices. This is changed depending on whether it is a random mint or not.
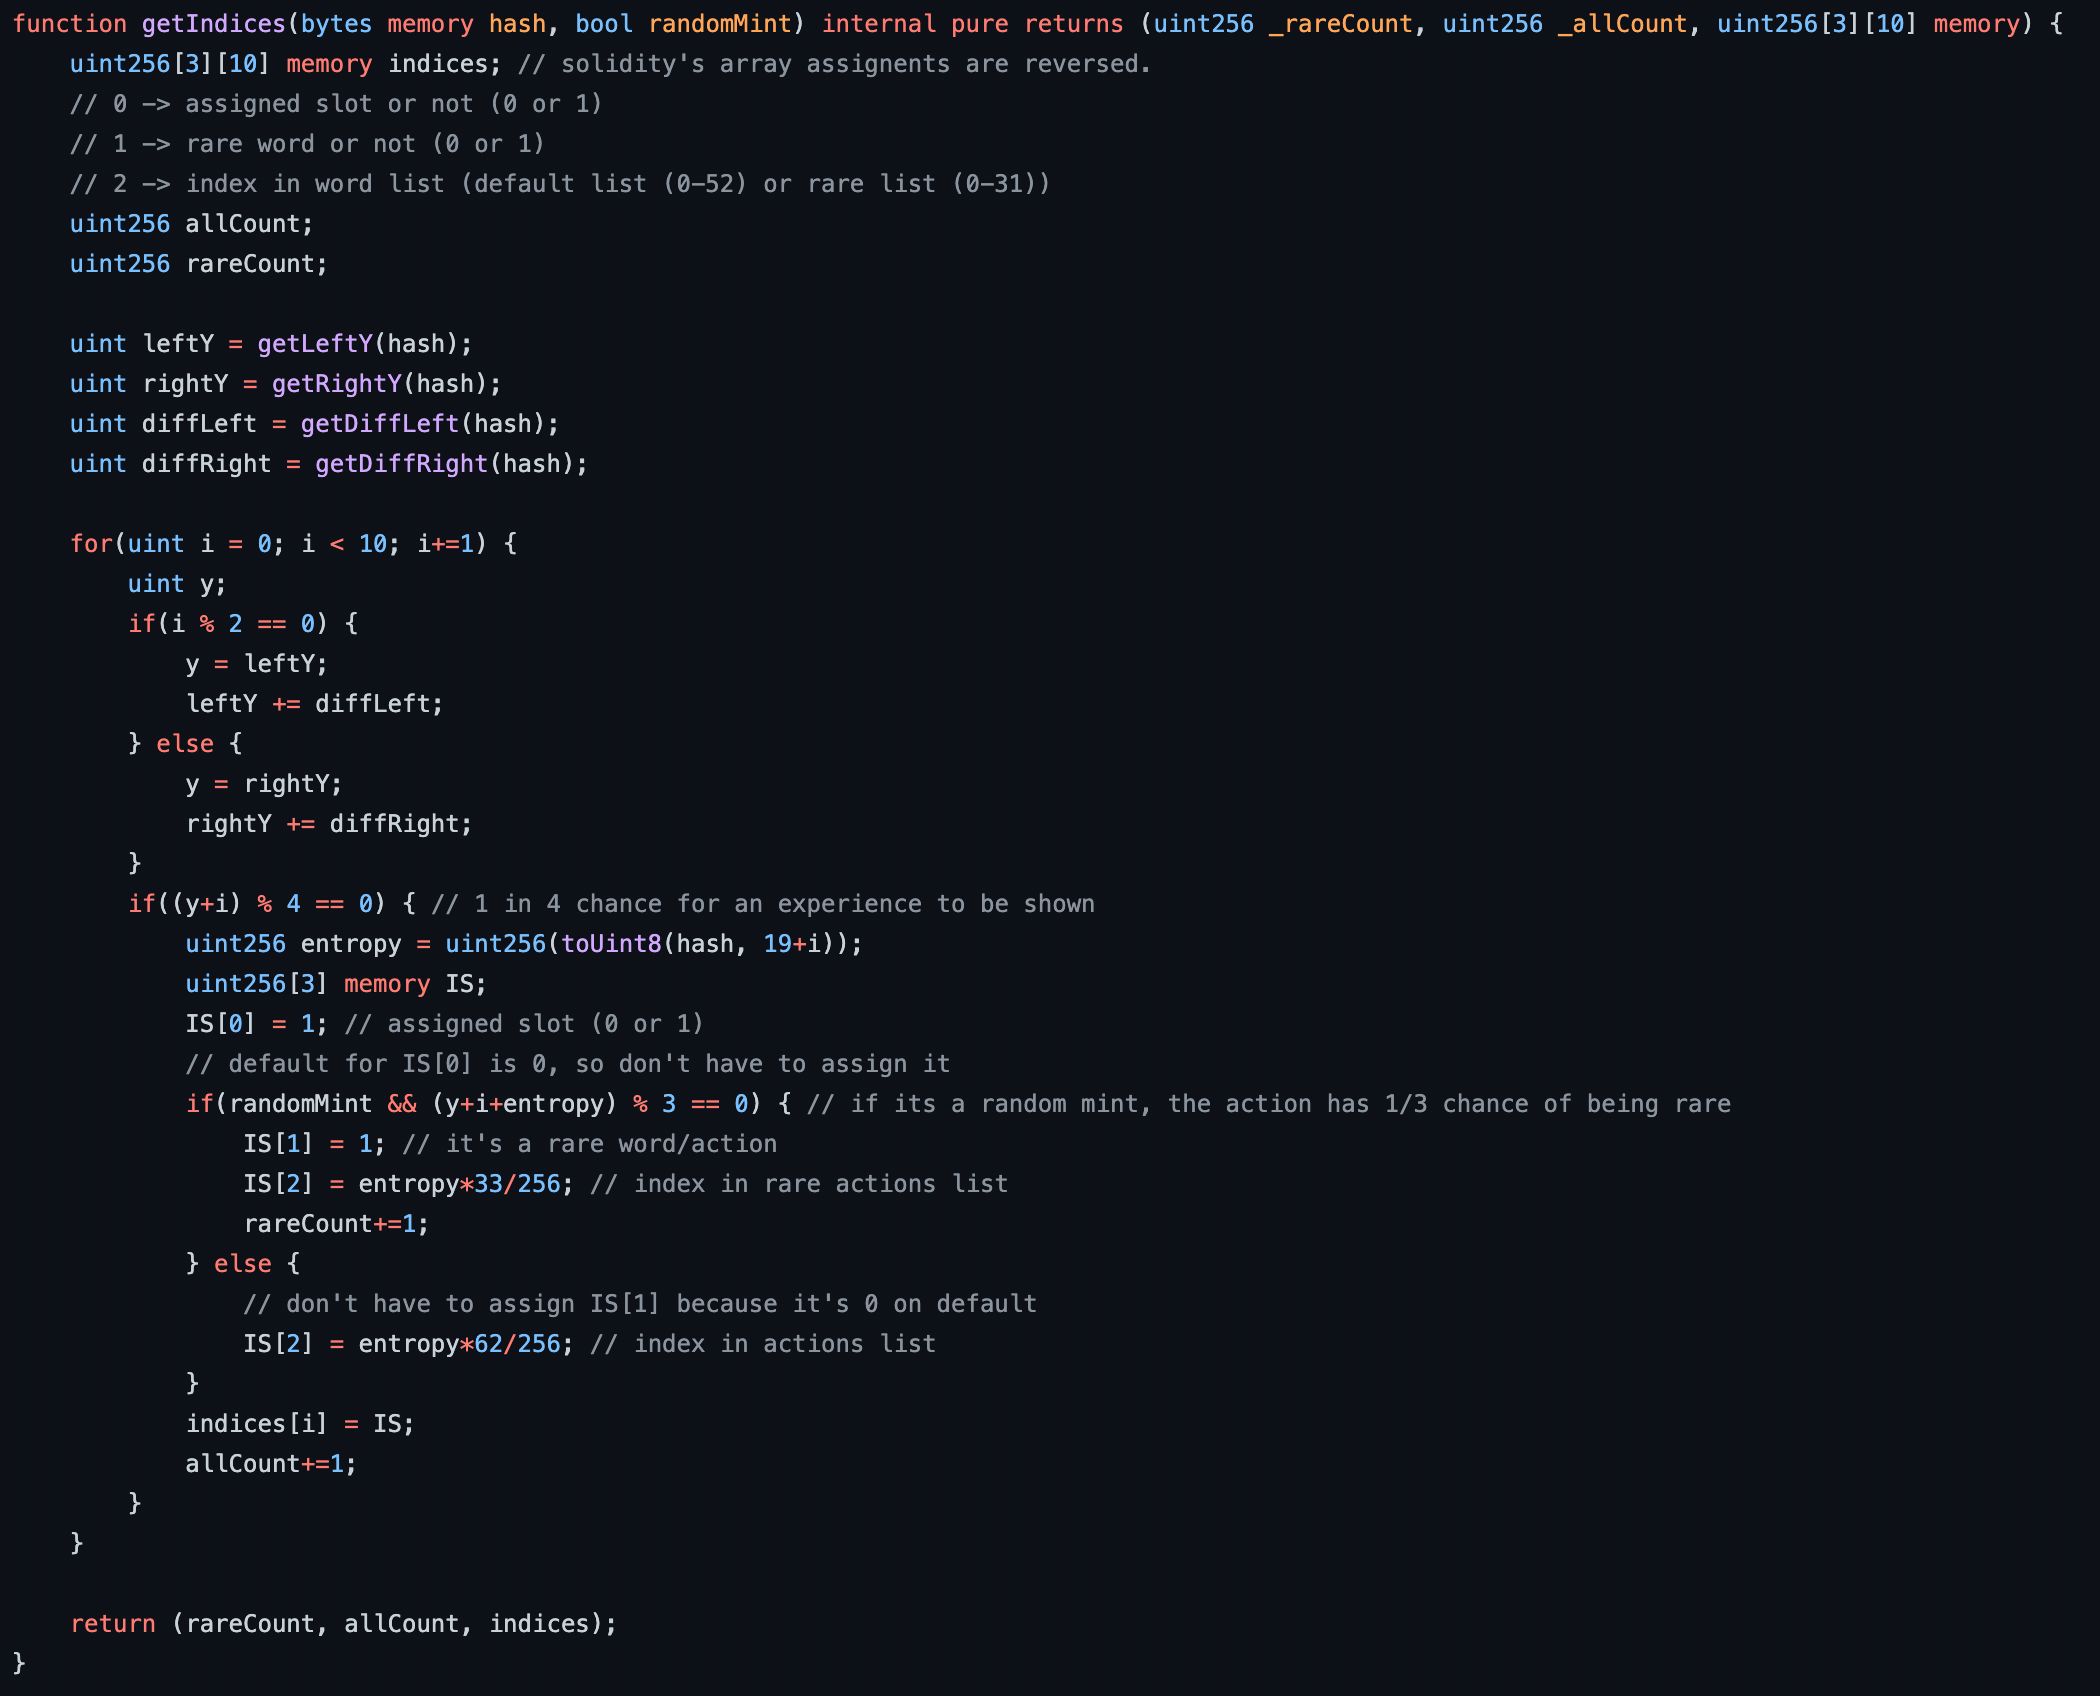
The marked experiences uses a total of 14 random variables to draw it. The first 4 determines the following:
Left Y: where does the left Y start at for the experiences (the first one) (100-116)?
Right Y: where does the right Y start at for the experiences (the first one) (100-116)?
Diff Left: what’s the spacing between each marked experience on the left (10 - 26)?
Diff Right: what’s the spacing between each marked experience on the right (10 - 26)?

For all 10 slots, it alternates between drawing on the left and then drawing on the right. As it does, it increments the Y position by the diff (difference/spacing).
For each slot, there’s a psuedo-random 1/4 chance of being drawn. If it’s a random mint, then there’s an additional 1/3 of it being a rare experience (one of 32). Then, it chooses one of the 62 or one of the 33 experiences. It then returns it to be either drawn (or concatenated for the metadata).
Thus, what you get is a set of marked experiences that are drawn at various points on the left and right sides of the capsule.
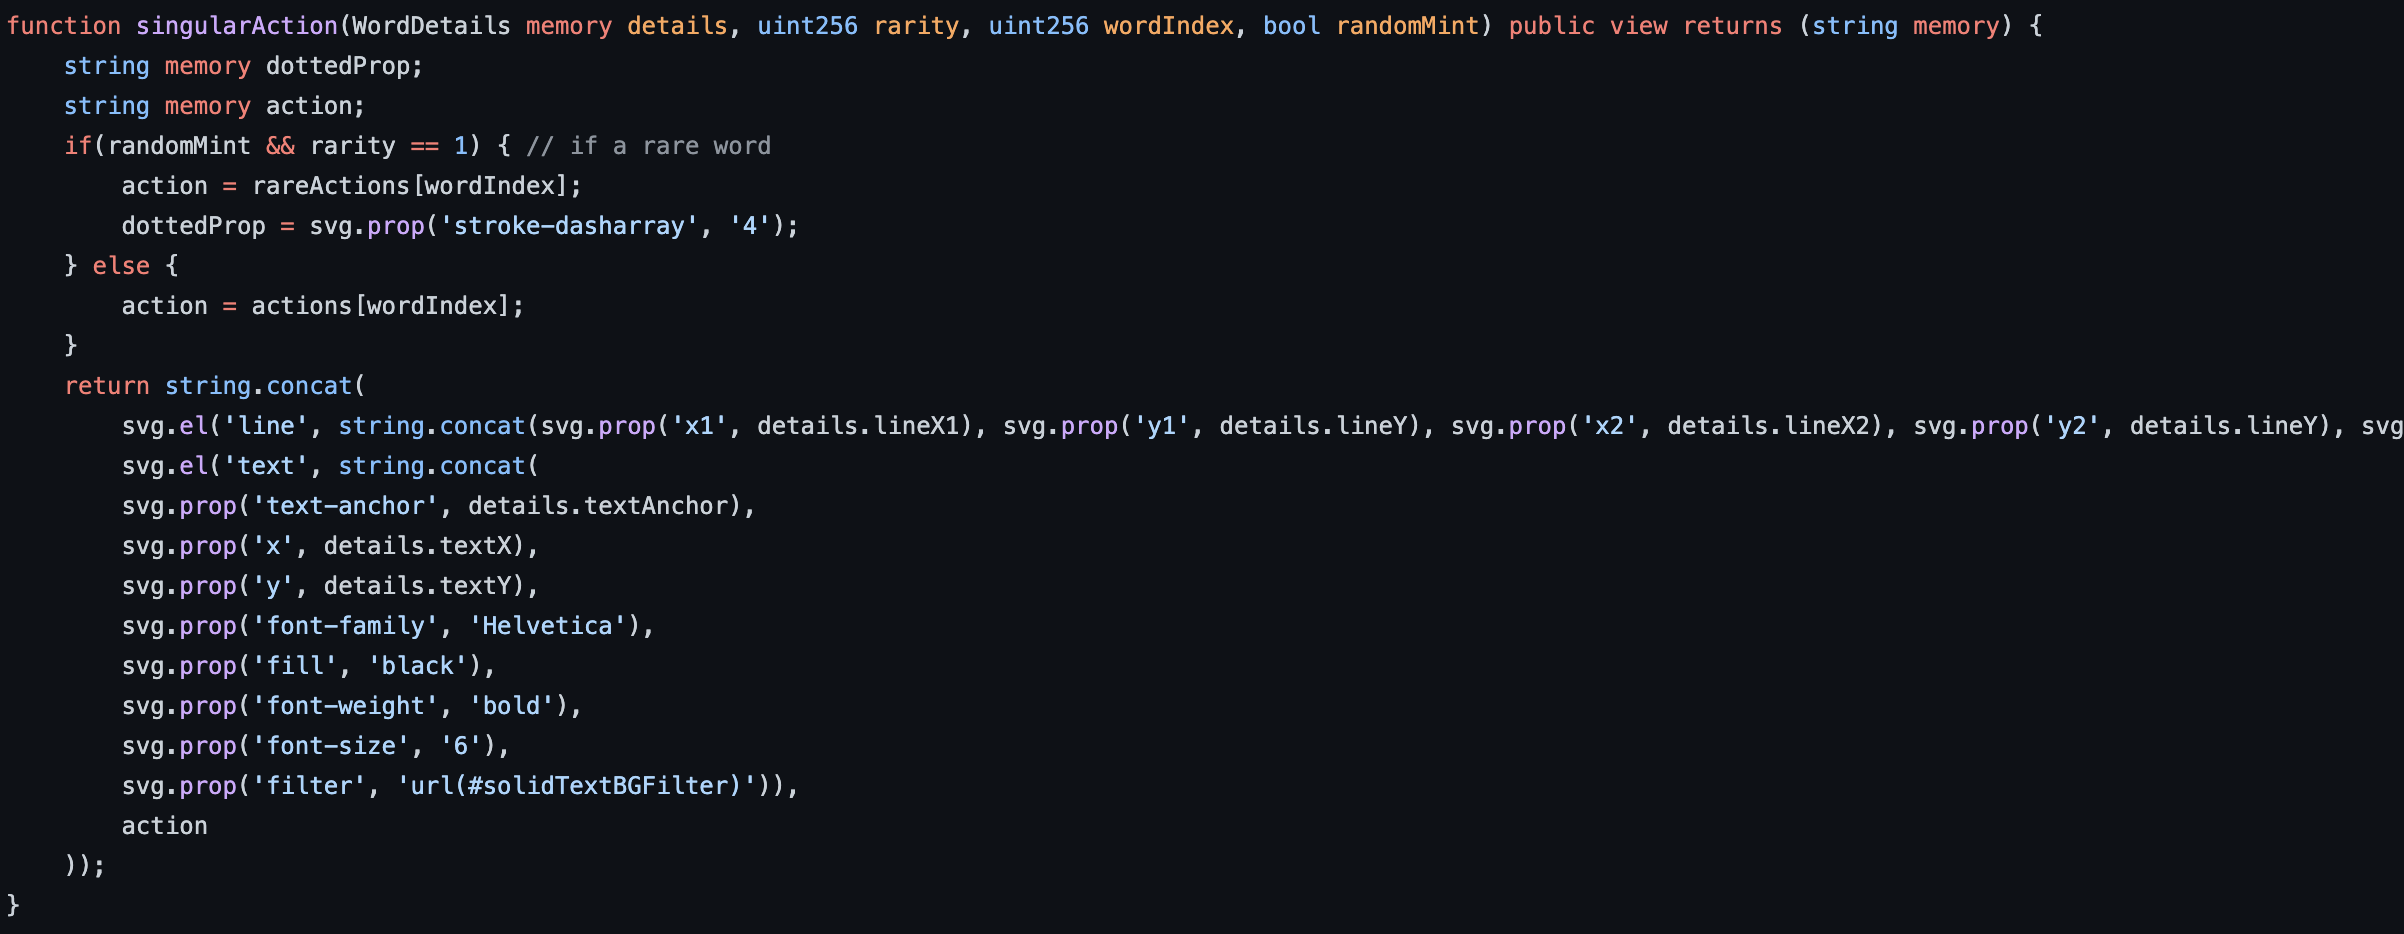
Making the text uniform on the left and right was a fun challenge, solved by adding a white background to the text and also anchoring it to the “start” or “end” of the text element. This anchors the text to the edges of the image.
A notable difference is that if it’s a rare experience, the line pointing to the layers are dotted to show its difference.
The Capsule Outline
The final layer is the outline, adding some additional visual elements to round it out. This adds thicker borders and introduces a discernible top + bottom to the capsule. It also adds the shadows/reflections.
There’s no randomness here, but we’ll show how it’s done. On its own, it looks like this (with the reflection not visible against a white background).


The top half of the capsule contains both a mask and clip-path. Without it, the top half of the capsule would look like this:

Re-using the same mask used in the primary cutout, it cuts out a the shape of the capsule in the background.

But, there’s the awkward rounded overhang at the bottom. A clip-path is the area that is kept, with everything not in the clip-path being snipped away. Thus, a simple clip-path is used here to keep the top and clip away the bottom.

The bottom half doesn’t have to be clipped since it slips into the top half of the capsule. It thus only re-uses the mask to create the appearance of the bottom half.

All it needs now is the cross-bar, which is just a simple rectangle:

Let’s move onto the reflection & drop shadow.
Reflection
I wanted to add some shine to the it, to signify that’s a clear capsule and to give some feeling of depth to it. The reflection has two parts. The reflection on top, and then it goes down the front. The light source is thus not on top and not directly in front of it, but slanted. The entire reflection consists of two white shapes that has a low opacity. There is a problem with that: if they overlap, they double up.

Thus, as before, we use a mask as before: letting through all the pixels, EXCEPT, the shape of the long reflection. This makes the top + long reflection in front look like it is part of one reflection.
Finally, we will take a look at the drop shadow.
Drop Shadow
By itself, the drop shadow looks like this:

The drop shadow itself is created by a filter.

It first blurs a small rectangle and then offsets it. The center is transparent. However, on its own, it looks like this:

This will cause a strange overlap across the capsule and so we need to use our trusty clip-path again to keep what we want. Here’s what the overlap looks like on the full capsule:

So, using the clip-path, we want to keep everything below that’s not creating the distortion across the capsule.

So, the clip-path essentially creates a bucket. If it was drawn directly, it would like this across the capsule:

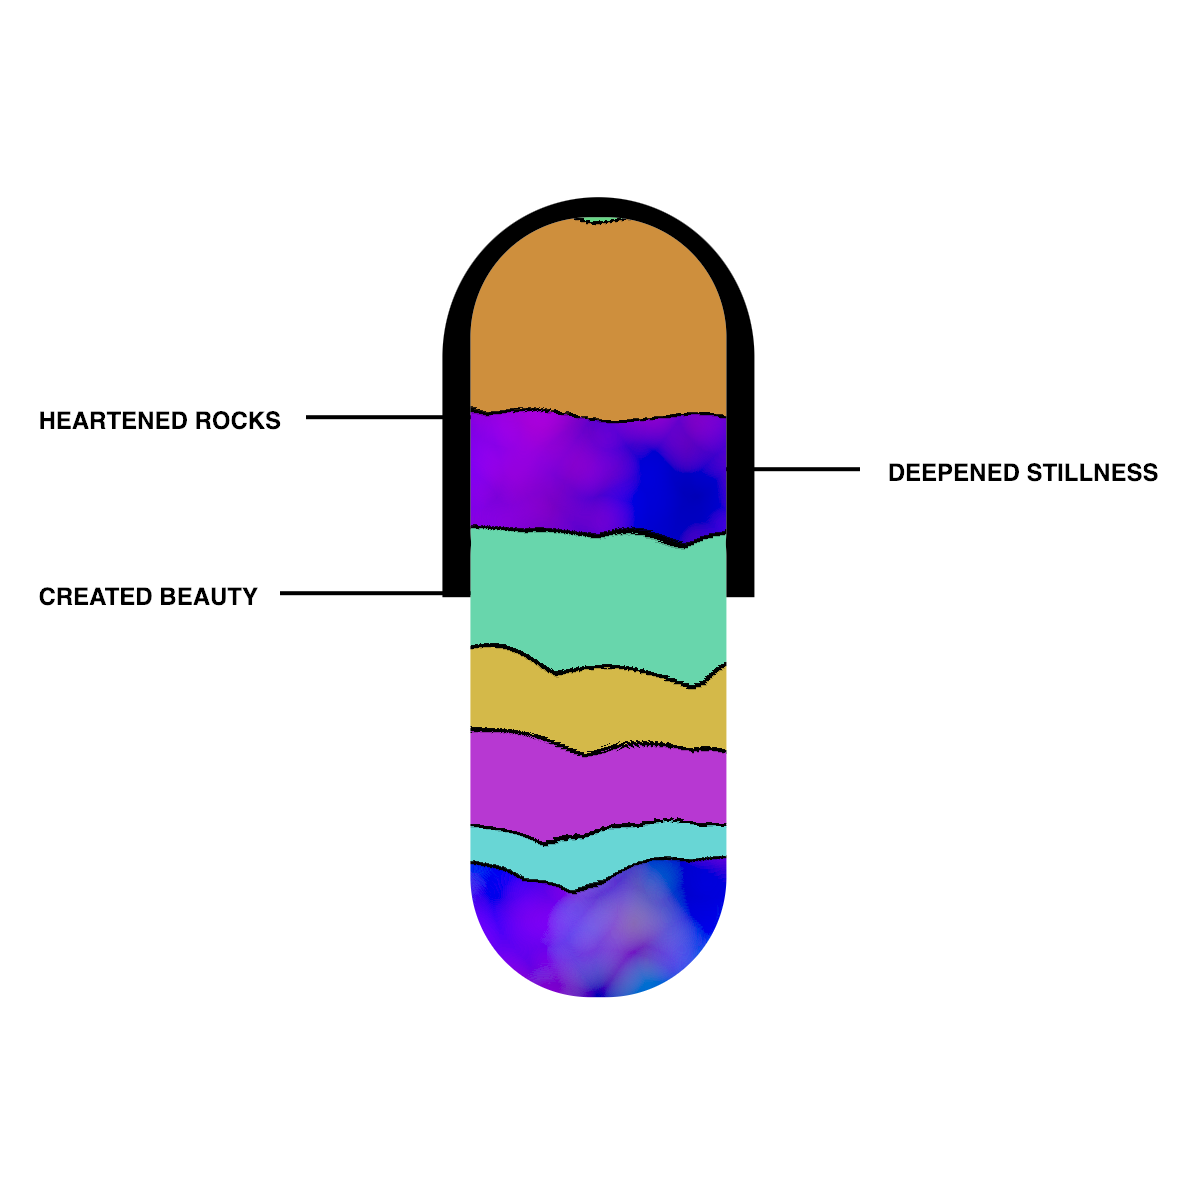
And, so, when all put together, we get back to the full capsule. One of a simulated mind marking that they have heartened rocks, deepened stillness, and created beauty. :)
There are many to craft these capsule and the SVG techniques we employed could be done differently, but this is the one that worked out the best.
Thank you!
We hope you enjoy the capsules and we hope you learned more about how these are designed, coded, and generated!
You can mint them here (until 31 October 2022): https://capsules.untitledfrontier.studio .
There’s an option to generate them with any seed, so you can play with the above variations. It’s a joy to work at this unique substrate: organically and automatically creating new generative SVG from on-chain randomness nestled inside an Ethereum smart contract. All in service to support storytellers!